Overview: You will import a photograph of yourself into Adobe Illustrator then trace it using the pen tool, creating a 100% vector self portrait. A successful vector self portrait will include many vector shapes representing highlights, shadows, and base colors of your face, clothing, and background. Consideration should also be given to the type of mood or feeling you wish to communicate through your self portrait.
Step 1: Illustrator Setup
Launch Adobe Illustrator and open a new web document
Click File>Place and navigate to your photo on the shared network.
 Select the Art Board tool.
Resize while holding the Shift key to maintain proportions if needed.
Reposition the image as needed to center your face and shoulders inside the art board.
In the layers panel, double click the layer and rename it to “Photo.”
Lock the layer.
Create a new layer, name it “Face Base.”
Step 2: Tracing with the pen tool
Set your Pen tool to no fill with a black 1 point stroke.
Trace a path around your entire face, including your neck and ears.
Use the Eyedropper tool (I) and click an area of your face that has a color that most closely matches your local skin color to fill your face shape.
First Vector layer, Face base

In the Layers panel, lock then hide the “Face Base” layer.
create a new layer named “Face Shadows.”
Trace around all of the areas of your face that are in shadow.
Use the Eyedropper tool to fill each of these shapes with a shadow color found in the photo.
Second vector layer, Face Shadow

Repeat the steps to create a “Face Highlight” layer.
Third Vector Layer, Face Highlight

Continue locking hiding and creating new layers for all of the remaining facial features.
Treat hair and clothing like the face, creating a base shape first, then create layers for shadows and highlights.
Fourth vector layer, Mouth

Fifth vector layer, Eyes

Sixth vector layer, Hair

How To Create a Beautiful Vector Portrait in Illustrator


The idea is to trace each ‘shape’ that has been produced from the posterization effect to recreate the image in vector format.

Use the Pen Tool to trace the brightest highlight on the cheek. Don’t worry about staying true to the exact outline, rounding off corners and drawing a more basic shape can often make for a better final image.

When the shape is complete, switch from the Pen tool to the Eyedropper and sample a tone from the base image. Switch out the default fill and stroke of the vector shape for this colour. Move onto the next level; trace; then sample the next tone.

Continue the process of tracing each subsequent layer and sampling the tones from the base image. Soon the portrait will begin to take shape. As two areas of the design meet, you may need to alter the stacking order by pressing the CMD+[ or CMD+] shortcuts.

The eyes of any portrait are the most important areas, so take the time to build up as many layers of detail as possible. Notice how the whites of the eyes are more than just white – They include a range of subtle colour changes which make for a more realistic image when viewed from afar.

As the facial features are added to the portrait the design becomes increasingly recognisable, yet it maintains that cool stylised effect with the visible layers and shapes.

Elsewhere on the artboard draw a wide, flat oval. Use the Pen tool to convert the anchors on each end to create sharp points. Press the ‘new’ icon in the Brushes palette to create a new brush setting.

Select ‘New Art Brush’ from the options box, then change the Method to Tints. This will allow us to change the colour of the brush strokes if necessary.

Use the Brush tool along with the new brush setting to add some extra definition and detail to the eyes. Outlining the eye and drawing a series of eyelashes really helps them stand out.

On a new layer use the Pen tool to roughly draw a shape to represent the basic hair line. It doesn’t matter too much about the awkward shape.

Use the brush tool with a 0.25pt stroke setting to draw in individual strands of hair to disguise the ugly hairline outline. If required, double click the Brush icon in the tools palette to alter settings such as ‘Keep Selected’.

Subtle highlights in the hair can be created by drawing thin 0.15pt strokes using brighter blue colours. A graphic tablet really comes in handy here.

Draw a few layers of hightlighting strokes, then change the transparency mode to Overlay and alter the opacity of each layer to tone down their prominence.

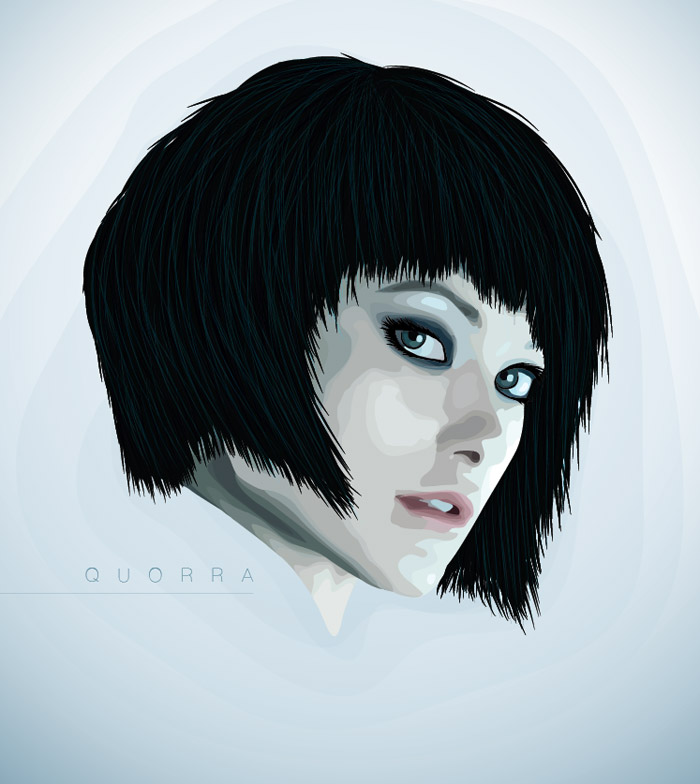
The portrait is really taking shape now the facial tones and hair are complete, so let’s finish off the design with a cool background.

Draw a rectangle to enclose the design and send it to the bottom of the layer stack. Add a radial Gradient fill using soft blue tones from the portrait.

Using a range of vexel style contour shapes in the background helps complement the style of artwork used in the portrait. Change these shapes to 15% opacity to tone down their prominence so they’re hardly noticeable.

A simple line of text finishes off the design nicely. Here I’ve added the name ‘Quorra’ in ulralight Helvetica Neue with super high tracking, neatly underlined with a thin border.
The whole process can be a little tedious, but with patience it can be relaxing to get your head down creating simple shapes for hours on end. The final artwork makes it all worth it, especially if you take the time to create a super realistic design with numerous layers.
