Workday on Mr. Potato Head

Good Morning! Today we will continue to work on our Mr. Potato Head practice. You will need at least 10 pieces with shadows &/ highlights shapes. Make sure you are using Layers to your advantage. Use the direct Direct Selection tool to double click anchor points to correct lines and clean edges. Tomorrow we will post are work to our blogs.

potato-head       layers.JPG

If you are finished with your ten pieces, you either: finish other pieces, finish your line artwork from last week, or create a new document and find an image of your choice to make vector. 🙂

Mr. Potato Head Practice

Good Morning! Today we will continue to work on our Mr. Potato Head practice. We will be focused on Shape and Value (highlights and shadow shapes), Pen Tool precision (as limited anchor points as possible), and using Layers efficiently (Ear layer, Ear highlights, Ear shadows, etc.).


Directions below:

Find the JPEG file Titled “Mr. Potato Head” in the folder:
Shared >Students >Fine Art >Pen Practice.
Drag this image to your home folder.

mr-potato-head

mr.4mr1

  1. Open a new Illustrator document.
  2. File> Place the Mr. Potato image on your Artboard.
  3. Name this layer reference image and lock it.
  4. Create a new layer name “Body” and trace the outline of the potato.
  5. Using the Eyedropper tool, fill this shape you made by clicking the potato color.
  6. Lock and hide this layer.
  7. Create a new layer named “Eye and Mustache layer”.
  8. Trace around the white eye shapes and black mustache shape.
  9. Use the Eyedropper tool to fill these shapes.
  10. Lock and hide this layer.
  11. Create a new layer named “Pupil and mustache highlights”.
  12. Continue working this way.

Good Morning!

We are going to keep practicing our pen tool skills in Illustrator Today and Tuesday. Follow the directions below:

  1. Please Finish experiences 5.2, and 5.3. Make sure you are following the steps on the blog post from Sept. 14th (Set fill to none, choose stroke color, Stroke weight at 3pt., Create new layer, etc.). Make sure you save these finished exercises to your home folder so I am able to check them on Wednesday.

  2. When you are finished with 5.2 and 5.3, you may start another image of you choice in the pen tool practice folder: Shared > Students> Fine Art > Pen Tool Practice). I added some new images to the pen practice folder. When setting up a new document,complete the following steps:

  • Create new document.
  • File > Place the image of you choice
  • Resize holding down shift.
  • Resize Art Board using art board tool if needed.
  • Lock your photo layer.
  • Create new layer and start tracing lines as accurately as you can.

Here are some of the new images in the pen practice folder:

c5ed58e37c9ad7949f77fb15b5df71ca8ed4f1c2e0e515e69861dd9cb48e3f0852249dd6cac86a3f2be6b7d84e02156592939d0c9265a87dde8a14872180306cc9c0f5c574bd7b869d2fa3840f09a4cf

Happy Friday!

If finished with the pen tool exercises 5.1, 5.2, and 5.3, you may start another image of you choice in the pen tool practice folder: Shared > Students> Fine Art > Pen Tool Practice).

  1. Create new document.
  2. File > Place the image of you choice
  3. Resize holding down shift.
  4. Resize Art Board using art board tool if needed.
  5. Lock your photo layer.
  6. Create new layer and start tracing lines as accurately as you can.

Pen Tool Exercises

Today we will continue the Pen Tool exercises. You can find these in the folder: Shared > Students > Fine Art > Pen Tool Practice. We will work on exercises 5.1, 5.2, 5.3. Remember: Complete each exercise 2-3 times (on separate layers) until you have mastered it. Tips: Press “P” to deselect, Edit > Undo if you made a mistake, and Ctrl + to zoom in and Ctrl – to zoom out.

Pen tool tutorials:  http://www.adobepress.com/articles/article.asp?p=1652772&seqNum=3.You can also watch Tutorial 1 and Tutorial 2videos found in the Shared > Students > Fine Art > Pen Tool Practice folders.

Complete these steps when starting the exercises: 

  1. Set Fill to None.

fill none

2. Select a Stroke color

stroke color

3. Set your Stroke Weight to 3 pt.

3 pt stroke

4. Click the Layer icon on the bottom right panel  layers

5. Click Add New Layer icon create new layer

6. Name the new Layer “Practice 1 or 2”

practice 1

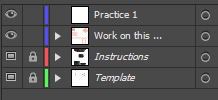
7. Click the Eye icon to hide “Work on this Layer” and make sure the top layer is highlighted before you start working.

hide

Please Remember: these are graded so save to your Home Folder > Graphic Design.

Good Morning!

Please complete the following:

  1. If you have not finished your Graphic Design Webquest Powerpoint, use your time today to do so. Please ask a neighbor if you are having trouble describing a certain design element in your image.

  2. If you are finished with the Webquest, spend at least 15 minutes searching the variety of Graphic Artists from the link below. It’s important to see different design styles and categories. Save your favorite 10 images to your Webquest folder. We will be using these images for our first blog post tomorrow.  https://rooseveltgraphicarts.wordpress.com/projects/graphic-artist-presentation/graphic-designer-presentation/

  3. When you are finished searching through the various artists and you have 10 images saved, you can log into your blog and experiment with different themes and explore the layout of wordpress:  https://wordpress.com/. Remember your login is your email address and your password is Capital first initial, lower case last name and your ID # (example: Bgaster23482)

  4. If you are finished with all of the above you can attempt Pen tool exercise 5.1 following the steps from the post below. We will continue this tomorrow.

    Have a great day!

Pen Tool Practice

Today we will start the Pen Tool exercises. You can find these in the folder: Shared > Students > Fine Art > Pen Tool Practice. We will work on exercises 5.1, 5.2, 5.3. Remember: Complete each exercise 2-3 times (on separate layers) until you have mastered it. Tips: Press “P” to deselect, Edit > Undo if you made a mistake, and Ctrl + to zoom in and Ctrl – to zoom out. Please ask your neighbors if you are having any issues. 

Pen tool tutorials:  http://www.adobepress.com/articles/article.asp?p=1652772&seqNum=3.You can also watch Tutorial 1 and Tutorial 2 videos found in the Shared > Students > Fine Art > Pen Tool Practice folders.

Complete these steps when starting the exercises: 

  1. Set Fill to None.

fill none

2. Select a Stroke color

stroke color

3. Set your Stroke Weight to 3 pt.

3 pt stroke

4. Click the Layer icon on the bottom right panel  layers

5. Click Add New Layer icon create new layer

6. Name the new Layer “Practice 1 or 2”

practice 1

7. Click the Eye icon to hide “Work on this Layer” and make sure the top layer is highlighted before you start working.

hide

Please Remember: these are graded so save to your Home Folder > Graphic Design.

Raster vs. Vector Graphics

raster-vector-comparisondifference-between-raster-and-vectormarilyn

What’s the difference between raster and vector? 

A raster image is made up of pixels, each a different color, arranged to display an image. A vector image is made up of paths, each with a mathematical formula (vector) that tells the path how it is shaped and what color it is bordered with or filled by.

Pros and cons of rasters and vectors

Raster images cannot be made larger without sacrificing quality. Vector images cannot display the natural qualities of photographs. Vector images are scalable, so that the same image can be designed once and resized infinitely for any size application – from a business card to billboard.

Adobe Photoshop is a raster editing program where in Adobe Illustrator you create vector graphics.


Happy Friday!

Today we will create our Graphics blogs and finish Part II of our Webquest project.

  1. Complete the following steps to create your blog under the tab: Your Blog > 01 Creating Your Blog. ( https://rooseveltgraphicarts.wordpress.com/your-blog/creating-your-blog/)
  2. Finish Webquest Part II. Make sure to explain why you chose that certain artwork for the design category.7e1eaa012450f364380a4d348fcd270a10e23b49ddc63fe4ab059a3778011f04
  3. If you get finished today, search through some of these Graphic Artist’s work to get a sense of how diverse graphics can be: https://rooseveltgraphicarts.wordpress.com/projects/graphic-artist-presentation/graphic-designer-presentation/. If you have any extra time you can explore WordPress and experiment with various layout themes.